

This is a very straight forward modification to the V2244 to improve the vacuum process on a UMAi bag. Actually no parts are modified, just removed.
My Journey with UMAi Bags

I have another question concerning these bags. I just read the instructions included in the inner bag of vac mouse seals. They say that I need to use a modern frost free fridge for sufficient air velocity and humidity control,no dorm fridges. These instructions were not on their website ! I just bought a 3.5 cubic fridge (little bigger than a dorm fridge) to use for the umai process. My modern big fridge is chuckerblock full of stuff like food ! I plan on using the smaller fridge and was wondering if opening the door once or twice a day will remove humidity and move the air a bit ?? Any thoughts from you great knowledgeable folks ?? Dave


cogboy, my advice is - put the sealed UMAI bag in the fridge (any household fridge) on a wire rack. Ignore humidity, door opening concerns and any other interfering questions you may have heard about, use the KISS theory which is keep it simple stupid, these bags are amazing, they work very well, I have 5 different meats in progress which I will post up photos of shortly, it is a never fail system. Just remember to keep the air flow around the package - that's all you need to do.cogboy wrote:Thanks, I'll check out their site .Shuswap wrote:Dave, I can't answer that one but have you tried the UMAi forum - that's a good question for those who are experienced with UMAi - I'm very much a novice with these bags.

Hi, I'm new here. Here's my post about the vacuum sealer modification. It should help get a better vacuum in the UMAi bags.
I recently decided to modify my vacuum sealer so that I no longer am dependent on the automated sealing feature. The sealer I use for the Umai dry bags is a Foodsaver V2244, a pretty basic model.
This vacuum sealer has the pretty much standard controls. One button starts the vacuum and then seals automatically. A second button either stops the vacuum and seals the bag, or simply seals the the bag (for adding a second seal or making bags from the roll material). Some units have more controls, but all should have these two basic functions.
These sealers have a pressure switch which controls when the vacuum is stopped and the seal is made. The assumption from the manufacturer is that the bag has the small channels embossed into the bags which allows the air to escape. The Umai dry bags don't have these, so occasionally, or more frequently even, the bags form enough of an air tight seal just beyond the unit to allow the pressure switch to actuate the sealing step even though there's still air in the bag.
Remove, or disable this switch and the vacuum pump will run continuously until you press the seal button. This will allow you to take the time to massage the air out of the bag and make the seal when you are satisfied wit the degree of air removed from the bag.
Of course you loose the automated vacuum sealing feature and probably any warranty you had on the unit.
Removing the switch on my unit was quite easy. Once the unit was opened by removing the bottom there was easy access to the controls. There's not much in these units. A vacuum pump, a pressure switch, some tubing, a small electric control circuit to time the sealing bar heater/pump operation.
On this unit there is a small tubing which runs from the vacuum pump to a "T". From the "T" the tubing continues the the sealing chamber as well as a vacuum switch.
Now, here, there are two ways to disable the automation:
1. Remove the vacuum switch from the vacuum tubing altogether. This is what I opted for since this unit is dedicated to dry bags.
2. Add a toggle switch to the circuit which effectively removes the vacuum switch from the control circuit. The toggle switch would let you choose between manual or automatic vacuum/sealing. This may be a better (albeit more work) choice if you use the unit for regular kitchen duty as well as for the dry bags. Depending on the sealer and how the vacuum switch is incorporated it may require some soldering on a circuit board.
Of my unit preventing the switch from being used was simple. Since the tubing from the pump goes to a "T", and there was enough tubing to to go straight from the pump to the sealing chamber - I simply removed the tubing from the "T" and connected the pump directly to the sealing chamber. The vacuum switch is still in the unit but no longer connected to the vacuum pump. When using the unit the switch never sees vacuum and so the pump will continue to run until you initiate the seal, or the pump overheats.
You still need the vac-mouse to keep some flow across the unit's gaskets.
A lot of words for a 5 minute job, here are some photos:
Before:
https://www.dropbox.com/s/waurz1ccl5zge ... 3%2014.jpg
Preparing to open the unit:
https://www.dropbox.com/s/1urssefbk4nvb ... 8%2053.jpg
https://www.dropbox.com/s/gl6q426rwrhfk ... 7%2051.jpg
Open and ready to perform modification:
https://www.dropbox.com/s/4ygylwcdvv01w ... 3%2035.jpg
https://www.dropbox.com/s/oiwroxnucdm1q ... 4%2040.jpg
Modified:
https://www.dropbox.com/s/uz19rvo7u5t21 ... 9%2008.jpg
Closed back up:
https://www.dropbox.com/s/3vjfbfiugtynp ... 2%2054.jpg
I hope this was helpful. Other units are certainly going to be different but the idea should work on all the automated vacuum sealers.
Richard

Hi Red,
The Italian made Maxima 2 is imported by Munro in Australia. They sell these units with a 5 year warranty here. They are the authorised Australian distributors carrying spares, accessories etc etc.
Munro is actually close to me and I will visit them shortly.
I am just evaluating a few Italian made models, all with the importers virtually on my doorstep.
The best guarantee to pay for anything like this is by credit card.
Cheers,
Jan.
Jan that Maxima 2 vac sealer is pricey at $600. I did the mod to my V2244 and yesterday redid 2 of the sopresatta bags, the capicola bag and a batch of bratwurst. Richard's modification was soooo easy and works like a hot damn. I still had to wait for the machine to cool down to make the recommended 2nd seal but considering the cost of the V2244 Foodsaver the wait is no real problem. Hey, I'm retired!
The sopresatta has been in the UMAi bags f or 20 days and lost 20% weight - seems to be taking a long time - hard to be patient.
Phil
The sopresatta has been in the UMAi bags f or 20 days and lost 20% weight - seems to be taking a long time - hard to be patient.
Phil
I'm also in the market for a new vac machine. The old Foodsaver is on it's last legs and barely gasps for air! I checked out that Maxima and it does not appear it's sold in NA. I will probably go with the ARY Vacmaster 112. Will pick one up when in the US this coming winter, for 509USD. Here it's 799CDN.

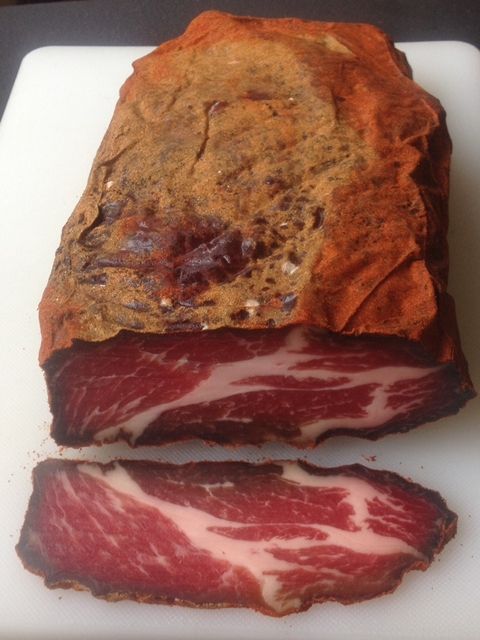
Capicola Is Done
Today I removed the capicola from the UMAi bag after 43 days in the fridge. There was no objectionable odor when it was removed from the bag. Being my first attempt at fermented meat I have these questions?
1. There are a few tiny dots of white mold some of which have a small off-white center. Is this bad mold? In my lifetime all mold was bad but I see that fermented meat can have good mold - news to me.
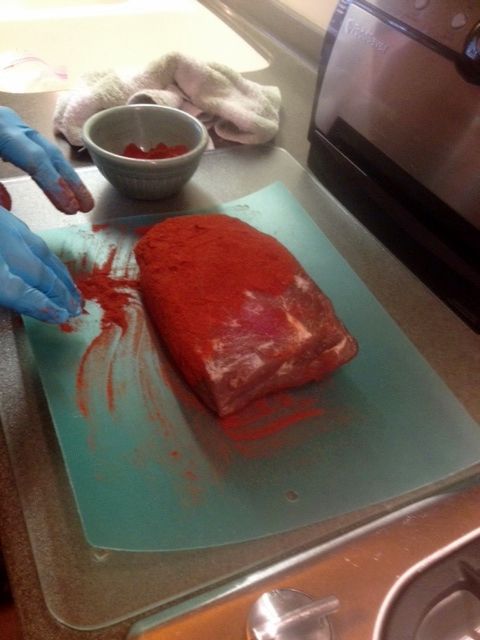
2. The coppa was smothered in paprika when it went into the bag. It is now discolored with some near-black areas. Is this bad? Should/can this be removed before slicing?
3. There is a dark ring around the outer edge. Should this be removed before slicing?
1. There are a few tiny dots of white mold some of which have a small off-white center. Is this bad mold? In my lifetime all mold was bad but I see that fermented meat can have good mold - news to me.
2. The coppa was smothered in paprika when it went into the bag. It is now discolored with some near-black areas. Is this bad? Should/can this be removed before slicing?
3. There is a dark ring around the outer edge. Should this be removed before slicing?
